I hope you enjoyed last week’s Jobim inspired post. One of the most important things you can have while learning the Alexander Technique is a sense of FUNNNNN. I don’t care what it is. But if you have something that you love doing for fun, it will make learning the Alexander Technique that much easier and rewarding.
:)
For regular readers, you will recall that I did a 4 part series of articles on Opposition (AKA Antagonistic Pulls). To recap, those 4 oppositions are:
The weight of the skull vs. the weight of the upper back
The weight of the torso vs the legs
The shoulders apart from the torso
The elbows open so that the forearm is away from the upper arm.
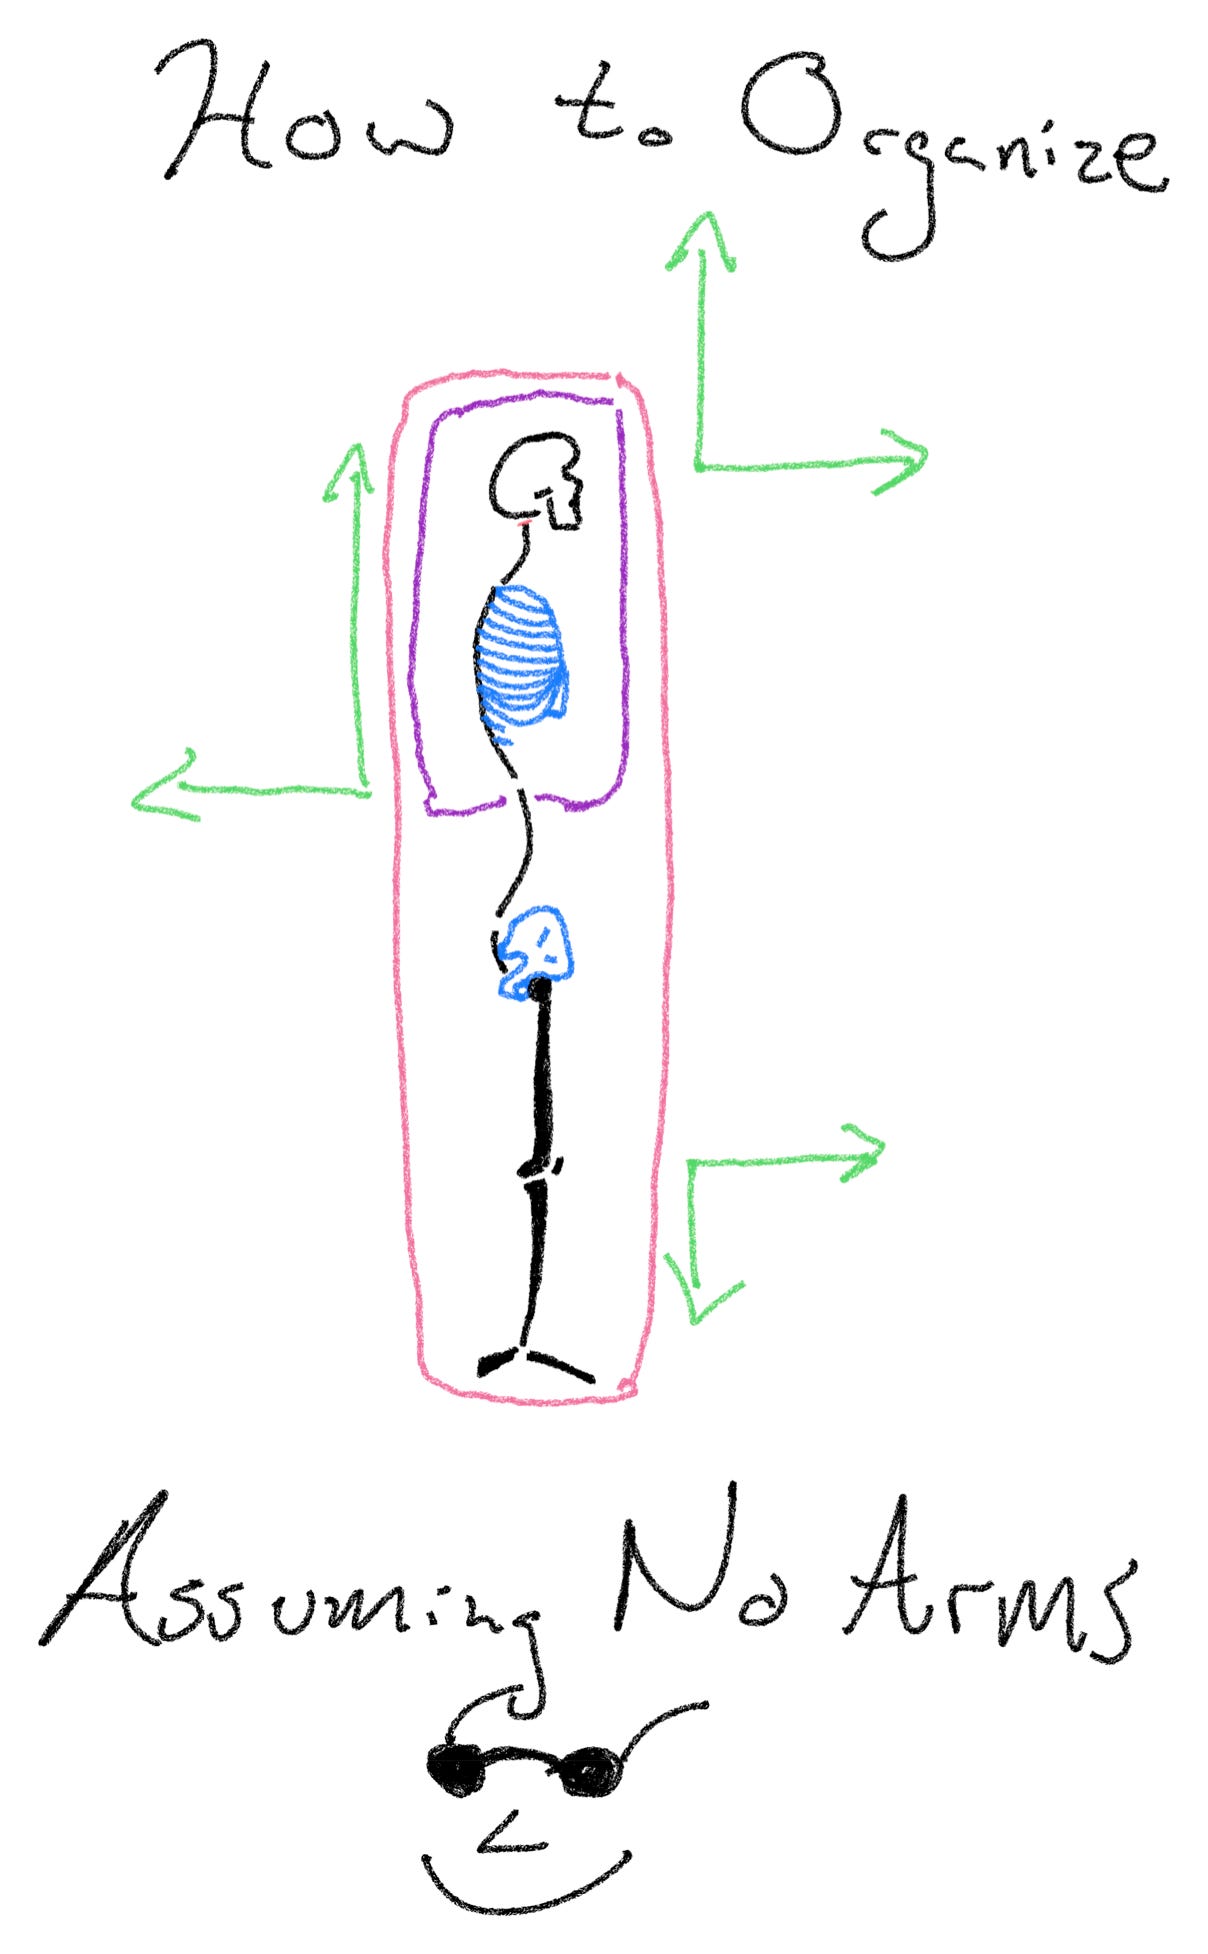
I’ve been sitting down with my pad of paper and making drawings the past few weeks as I prepare my thoughts for a ‘little book’. One of the images I keep in my head is how these antagonistic pulls all come together. To get you started, I’m going to share with you a drawing of how Opposition 1 and 2 tie together.
If you look extremely closely, I managed to get the correct number of ribs in that cage. Yeah. So cool.
Anyway….. What the heck are we looking at here?
The Purply Section
Well I’ll start by describing what happens with Opposition 1.
If the neck is releasing tension - that is…it’s free of unnecessary strain - then the weight of the head will respond to that and begin to release ‘forward and up’.** This is indicated with the green arrows near the skull.
At nearly the same time, the upper back will release ‘back and up’ IF you are preventing the chest from overly lifting or slumping and you prevent an arch in the back. FM Alexander calls all of these bad things ‘narrowing the back’. If you are ‘widening the back’ then you will experience this as the green arrow going ‘back and up’.
Do you see a commonality here? None of the weight in Opposition 1 is DOWN.
Furthermore, there is an opposition of the forward direction of the head and the backward direction of the back. If you look at the curves of the spine, they are suggesting how the weight is organising. Any attempt to hold these joints in a rigid way will destabilise your sense of balance and create a lot of force.
The Pink Section
When Opposition 1 is functioning sufficiently, that overall sense of NOT DOWN kicks in and you begin to experience all of that weight as one moveable purply blob. If the hips are free and the legs are releasing unnecessary tension, then the knees begin to go ‘forward and away’ from the hips.
This is the third set of arrows in my diagram.
I want to stress that the arrows don’t point down with force. What typically happens to people is that they place unnecessary tension in their legs and the added force of the quadriceps pulls the leg up into the hip socket. If you can trust that your legs don’t need to actively freeze themselves in place to keep you upright, the knees will begin to go away from the hip (and the head) without you manually trying to stretch your legs out.
In Walking
If you look at the opposition of the torso and the knees in walking, you will see that the back stays ‘back and up’ and the knees are ‘forward and away’. If you can prevent the torso from pushing forward and down onto the hips (the dreaded Black Hole of Trudge), you will experience a much lighter walk. It will feel like the legs are totally free when done correctly.
OK John…. So What?
In each of these cases…and truly in the case of all of these oppositions we have:
An open channel (neck/hip)
Weights that harmoniously function around that channel / Weights that are away from the channel.
This open channel/opposition is nearly a reflex. I say nearly because that implies that I just have to knock your neck the right way and everything will spring open. Unfortunately, it will only begin to do its reflex thing if you can STOP and feel what is happening first.
I’ll leave you with this for now because I don’t want to kill you with information.*** I think this diagram should be memorised by every Alexander Technique student because when it comes time to squat (or do anything more complicated), you’ll want this information so that you can really feel where your squat goes wrong and strategise how to improve your technique.
Let the Back be Back and Up.
Well…I hope you know what this phrase means now!
And for further housekeeping… if you haven’t gotten the Substack app, I use it to post previews for the ‘little book’ and ask questions to readers. You might find it handy!
** If I have not driven home what the head going ‘back and down’ means, ask me! It will be a part of the ‘little book’ for sure.
*** PLUS I need to do the drawings for opposition 3 and 4 to tie things together!


